This is for my little Doc McStuffins fan, Emma. It is toddler size 12-24 months
and a pretty easy project. It is a little hard to find sparkle yarn, but I used Caron Simply Soft Party in Fuchsia sparkle, and Caron Simply soft Chocolate from my stash. You can find the sparkle yarn at JoAnn Fabrics.
For this yarn I used an I or 5.5 mm hook, and also a yarn needle to sew on the flower.
Start with Chocolate.
To start make a magic loop or a chain 4 loop and chain 2.
Round one: make 10 DC in the loop, slip stitch to the top of the first stitch and chain 2.
Round two: make 2 DC in each stitch around, slip stitch to the top of the first stitch, chain 2. (20 DC total)
Round three: make *2 DC in the first stitch, one DC in the next, repeat around and slip stitch to the top of the first stitch. Chain 2. (30 DC)
Round four: make *2 DC in the first stitch, one DC in the next 4 stitches, repeat around and slip stitch to the top of the first stitch, chain 2. (36 DC)
Round five: make *2 DC in the first stitch, one DC in the next 5 stitches, repeat around and slip stitch to the top of the first stitch, chain 2. (42 DC)
Round six: make *2 DC in the first stitch, one DC in the next 6 stitches, repeat around and slip stitch to the top of the first stitch, chain 2. (48 DC)
Round seven: make *2 DC in the first stitch, one DC in the next 7 stitches, repeat around and slip stitch to the top of the first stitch, chain 2. (54 DC)
Rounds eight-ten: make 1 DC in each stitch around, slip stitch to the top of the first stitch, chain 2. (54 DC) after the tenth round slip stitch to the top of the first DC, tie off and change to Fuchsia sparkle and chain 1.
Rounds eleven-14: make 1 SC in each stitch around, slip stitch to the top of the first SC, chain 1. (54 SC)
At the end of round 14 tie off the Fuchsia and change back to Chocolate and chain 2.
Rounds 15-16: make 1 DC in each stitch around, slip stitch to the top of the first stitch, chain 2.
Ear Flaps:
After you finish round 16 start on the first ear flap.
Row 1: 1 DC in the next 12 stitches, chain 2 and turn.
Row 2: skip the first stitch, 1 DC in the next 9 stitches, DCD in the last two stitches, chain 2 turn.
Row 3: skip the first stitch, 1 DC in the next 7 stitches, DCD in the last two stitches, chain 2 turn.
Row 4: skip the first stitch, 1 DC in the next 5 stitches, DCD in the last two stitches, chain 2 turn.
Row 5: skip the first stitch, 1 DC in the next 3 stitches, DCD in the last two stitches, chain 2 turn.
Row 6: skip the first stitch, 1 DC in the next stitch, DCD in the last two stitches, chain 2 turn.
Row 7: DCD and tie off.
Count 20 stitches across the front of the hat and begin the second ear flap using the instructions above.
To finish the bottom of the hat starting at the tip of the ear flap SC evenly around the bottom of the hat, 1 SC per stitch in chocolate.
Flower:
Using the Fuchsia Sparkle chain 5 and make a loop.
Round 1: chain one and make 15 SC in the loop, slip stitch to the top of the first st.
Round 2: chain 3, skip the first two stitches and slip stitch in the third stitch. Repeat around making 5 chain 3 loops.
Round 3: for the Petals 1 SC, chain 2, 4 DC, chain 2, 1SC in each loop around, slip stitch to the bottom of the first chain 3 and tie off leaving enough string to sew on the flower. You can put a yellow button in the center if desired.
Braids, for each braid I cut 15 32 inch strands and braided using 5 strands in each part of the braid. Braid, make a knot at the bottom and cut off the ends to make it even.
A Mother/Daughter blog based on passing along traditions in cooking and crafting.
Sunday, July 28, 2013
Friday, July 26, 2013
Zucchini Bread
This is one of my favorite recipes for Zucchini Bread, it is nice and moist and the recipe can be adapted and made as a cake as well. For a cake I would add cream cheese frosting and make it in a 9 x 11 inch pan.
3 eggs
1 cup oil
2 cups sugar
2 cups grated zucchini
2 teaspoons vanilla
3 cups flour
1 teaspoon salt
1 teaspoon baking soda
1 teaspoon baking powder
3 teaspoons cinnamon
1 cup of raisins or nuts (optional)
For Bread: Beat the eggs well, add oil, sugar, zucchini, and vanilla. Add remaining ingredients and mix well. Bake at 350 degrees for 1 hour. Makes 2 loaves.
For Cake: Use the same ingredients: however use 2 cups flour instead of 3 cups. Bake cake accordingly in a 9 x 11 inch pan.
3 eggs
1 cup oil
2 cups sugar
2 cups grated zucchini
2 teaspoons vanilla
3 cups flour
1 teaspoon salt
1 teaspoon baking soda
1 teaspoon baking powder
3 teaspoons cinnamon
1 cup of raisins or nuts (optional)
For Bread: Beat the eggs well, add oil, sugar, zucchini, and vanilla. Add remaining ingredients and mix well. Bake at 350 degrees for 1 hour. Makes 2 loaves.
For Cake: Use the same ingredients: however use 2 cups flour instead of 3 cups. Bake cake accordingly in a 9 x 11 inch pan.
Thursday, July 18, 2013
Chocolate Zucchini Cake
2 1/2 cups all purpose flour
1/2 cup cocoa
2 1/2 teaspoons baking powder
1 1/2 teaspoons baking soda
1 teaspoon salt
1 teaspoon cinnamon
3/4 cup soft butter
2 cups sugar
3 eggs
2 teaspoons vanilla
2 cups grated zucchini
1/2 cup milk
1 cup of nuts if desired
1 cup chocolate chips
Combine flour, cocoa, baking powder, baking soda, salt and cinnamon and set aside. With your mixer beat together butter and sugar until smooth. Add eggs, 1 at a time, beating well after each. Add vanilla, fold in flour mixture alternately with milk and zucchini. Pour into a greased and floured bundt pan and bake at 350 degrees for 1 hour.
Monday, June 17, 2013
Red, White, & Blue Baby Boy
Here's the pattern:
Materials:
- Size 7 Circular Needle 16 inches
- Lion Brand Wool-Ease yarn in Navy, Ranch Red, and White Frost
- Stitch Marker
- Yarn Needle
Cast on 80 stitches in Navy. Knit in K2,P2 rib for 1 inch. Knit 2 rows in stockinette stitch. Begin pattern.
Row 1: Switch to Red, *Knit 3, Slip 1 with yarn in back* Repeat.
Row 2: *Purl 3, Slip 1 with yarn in back* Repeat.
Rows 3&4: Switch to Navy and knit entire row.
Row 5: Switch to White, Knit 1, *Slip 1 with yarn in back, knit 3* Repeat to last 3 stitches, Slip 1 with yarn in back, knit 2.
Rows 7&8: Switch to Navy and knit entire row.
Repeat Rows 1 thru 8 three times more, then repeat rows 1 through 4 (you should end two rows after fifth red row). Decrease as follows:
Row 1: Knit 8, Knit 2 together, repeat.
Row 2: Knit 7, Knit 2 together, repeat.
Row 3: Knit 6, Knit 2 together, repeat.
Row 4: Knit 5, Knit 2 together, repeat.
Row 5: Knit 4, Knit 2 together, repeat.
Row 6: Knit 3, Knit 2 together, repeat.
Row 7: Knit 2, Knit 2 together, repeat.
Row 8: Knit 1, Knit 2 together, repeat.
Row 9: Knit 2 together, repeat.
Sew up remaining 8 stitches and tie in all ends.
Thursday, May 16, 2013
Rhubarb Coffee Cake
This is an old recipe from a cookbook that Lucy Boykin, a former kindergarten teacher that lived near my parents growing up compiled to raise money for scholarships, she was a sweet lady and loved by all. Rhubarb is one of my springtime favorites and this recipe is so good that even people who think they hate rhubarb like it.
1 1/2 cups brown sugar
1/4 cup white sugar
1/2 cup shortening (I use butter)
Cream together
Add:
1 egg
2 cups flour
1 tsp baking soda
1 cup buttermilk or sour milk
1 1/2 cups cut up raw rhubarb
Add dry ingredients slowly, alternately with milk. Fold in the rhubarb. Pour into a 9 x 13 greased pan.
Top with 1/3 cup sugar and 1 tsp. cinnamon (mixed). Bake at 350 degrees for 30-40 minutes. Serve with whipped cream.
1 1/2 cups brown sugar
1/4 cup white sugar
1/2 cup shortening (I use butter)
Cream together
Add:
1 egg
2 cups flour
1 tsp baking soda
1 cup buttermilk or sour milk
1 1/2 cups cut up raw rhubarb
Add dry ingredients slowly, alternately with milk. Fold in the rhubarb. Pour into a 9 x 13 greased pan.
Top with 1/3 cup sugar and 1 tsp. cinnamon (mixed). Bake at 350 degrees for 30-40 minutes. Serve with whipped cream.
Bee Slouchy
Because of a small incident involving an exploding gallon of paint, I am the proud new owner of a grey winter coat. So here is the hat I created to go with it. I did yellow and grey (to match some gloves I already own), but it would be fun in any color combination!
Materials:
Martha Stewart Crafts Extra Soft Wool Blend in grey pearl
Caron Simply Soft in sunshine
Size 7 circular needle 16"
Yarn needle
Pattern:
Cast on 88 stitches in grey pearl. Place marker and join. Knit 6 rows in knit 2, purl 2 rib. Knit 1 row.
Begin repeats:
Row 1: Switch to sunshine yarn. Knit 1 row.
Row 2: Purl.
Row 3: *Purl 2 together, yarn over*, repeat.
Row 4: Purl.
Rows 5-8: Knit.
Row 9: Purl
Row 10: *Purl 2 together, yarn over*, repeat.
Row 11: Purl.
Rows 12-15: Switch to pearl grey and knit.
Repeat Rows 1-15 once more and rows 1-11 again.
Switch to pearl gray and begin decrease
Row 1: *Knit 9, K2tog* repeat.
Row 2: *Knit 8, K2tog* repeat.
Row 3: *Knit 7, K2tog* repeat.
Row 4: *Knit 6, K2tog* repeat.
Row 5: *Knit 5, K2tog* repeat.
Row 6: *Knit 4, K2tog* repeat.
Row 7: *Knit 3, K2tog* repeat.
Row 8: *Knit 2, K2tog* repeat.
Row 9: *Knit, K2tog* repeat.
Row 10: K2tog 8 times. Break yarn and sew remaining stitches together, secure tightly and weave in ends.
To make the hat slouchier, add a row of knit in either the yellow or gray band (or both).
Materials:
Martha Stewart Crafts Extra Soft Wool Blend in grey pearl
Caron Simply Soft in sunshine
Size 7 circular needle 16"
Yarn needle
Pattern:
Cast on 88 stitches in grey pearl. Place marker and join. Knit 6 rows in knit 2, purl 2 rib. Knit 1 row.
Begin repeats:
Row 1: Switch to sunshine yarn. Knit 1 row.
Row 2: Purl.
Row 3: *Purl 2 together, yarn over*, repeat.
Row 4: Purl.
Rows 5-8: Knit.
Row 9: Purl
Row 10: *Purl 2 together, yarn over*, repeat.
Row 11: Purl.
Rows 12-15: Switch to pearl grey and knit.
Repeat Rows 1-15 once more and rows 1-11 again.
Switch to pearl gray and begin decrease
Row 1: *Knit 9, K2tog* repeat.
Row 2: *Knit 8, K2tog* repeat.
Row 3: *Knit 7, K2tog* repeat.
Row 4: *Knit 6, K2tog* repeat.
Row 5: *Knit 5, K2tog* repeat.
Row 6: *Knit 4, K2tog* repeat.
Row 7: *Knit 3, K2tog* repeat.
Row 8: *Knit 2, K2tog* repeat.
Row 9: *Knit, K2tog* repeat.
Row 10: K2tog 8 times. Break yarn and sew remaining stitches together, secure tightly and weave in ends.
To make the hat slouchier, add a row of knit in either the yellow or gray band (or both).
Tuesday, May 7, 2013
Toddler Shark Hat
Black
White
Silver Grey
Scarlet
I used an I/5.5mm hook
I also used a 7/8" button, but 5/8 would work too.
Starting with Silver Grey make a loop, either 4 chain loop or magic loop, then ch 2.
Round 1: make 12 DC in the loop and sl st at the top of the first DC, ch 2.
Round 2: 2 DC in each st around and sl st at the top of the first DC, ch 2 (24 DC)
Round 3: 2 DC in the first st, 1 DC in the next, repeat around and sl st at the top of the first DC, ch 2 (36 DC)
Round 4: 2 DC in the first st, 1 DC in the next two sts, repeat around and sl st at the top of the first DC, ch 2 (48 DC)
Round 5: 2 DC in the first st, 1 DC in the next 5 sts, repeat around and sl st at the top of the first DC, ch 2 (56 DC)
Rounds 6-12: 1 DC in each st around, sl st at the top of the first DC, ch 2 (56 DC)
Start on the chin strap at the end of round 12.
Chin Strap:
Row 1: 1 DC in the next 8 sts, ch 2 and turn.
Row 2: 1 DC in the next 6 sts, DCD in the last two sts. ch 2 turn.
Row 3: 1 DC in the next 7 sts. ch 2 turn.
Row 4: 1 DC in the next 5 sts. DCD in the last 2 sts., ch 2 turn.
Rows 5 & 6: 1 DC in the next 6 sts. ch 2 turn.
Row 7: sk the first st 1 DC in the next 4 sts. ch 2 turn.
Row 8: 1 DC in the next 5 sts., ch 2 turn.
Row 9: sk the first st 1 DC in the next 4 sts. ch 2 turn.
Row 10: 1 DC in the next 4 sts. ch 1 turn
Row 11: 1 SC in the 1st st. ch 2 sk the next 2 sts 1 sc in the last st. ch 1 turn.
Row 12: 1 SC in the 1st st. 2 SC in the ch 2 space, 1 SC in the last st. Tie off string and weave in the end.
For the chin strap on the other side join leaving 18 stitches across the back of the hat, and 24 across the front of the hat, repeat rows 1 through 7 and tie off and weave in the end, sew the button on between rows 5 and 6.
For gums and teeth start at the bottom of the longer chin strap and join with scarlett, SC evenly up the front side of the chin strap and then 1 SC in each st across the front of the hat and down the short side of the chin strap. For teeth again starting at the bottom of the longest chin strap count your scarlett stitches to see how many you have, (I had 22) for each tooth you need 3 stitches and you will use a few SC at the bottom to make it so your last tooth ends where the chin strap joins the front of the hat. (see photo) I had 2 SC then 6 teeth up the front side of the chin strap. A tooth is made by making a sl st in the first st, *chain 3 then make 2 DC in the same st., sk the next st and sl st in the next st, repeat from *. You should end up with 8 teeth across the front and 4 down the button side. If you need you can leave a few SC in the corners of the mouth of the shark or at the bottoms of the chin strap.
Fin, make a magic loop and ch 2.
Round 1: 6 DC in the loop and pull it tight, sl st to the top of the 1st DC ch 2.
Round 2: 2 DC in the first st, 1 DC in the next st repeat around, sl st to the top of the first DC, ch 2.
Round 3: 2 DC in the first st, 1 DC in the next st repeat around, sl st to the top of the first DC, ch 2.
Round 4: 2 DC in the first st, 1 DC in the next st, repeat around, sl st to the top of the first DC, ch 2.
Round 5: 2 DC in the first st 1 DC in the next 2 sts., repeat around, sl st to the top of the first DC, ch 2.
Round 6: 1 DC in the next 4 sts, 1 SC in the next 6 sts, 1 DC in the next 8 sts, 1 SC in the next 6 sts, 1 DC in the last 4 sts, tie off leaving enough yarn to sew fin to the top of the hat.
Eyes:
start with black and make a magic loop. Make 8 SC in the loop and pull it tight, sl st to the top of the first SC and tie off.
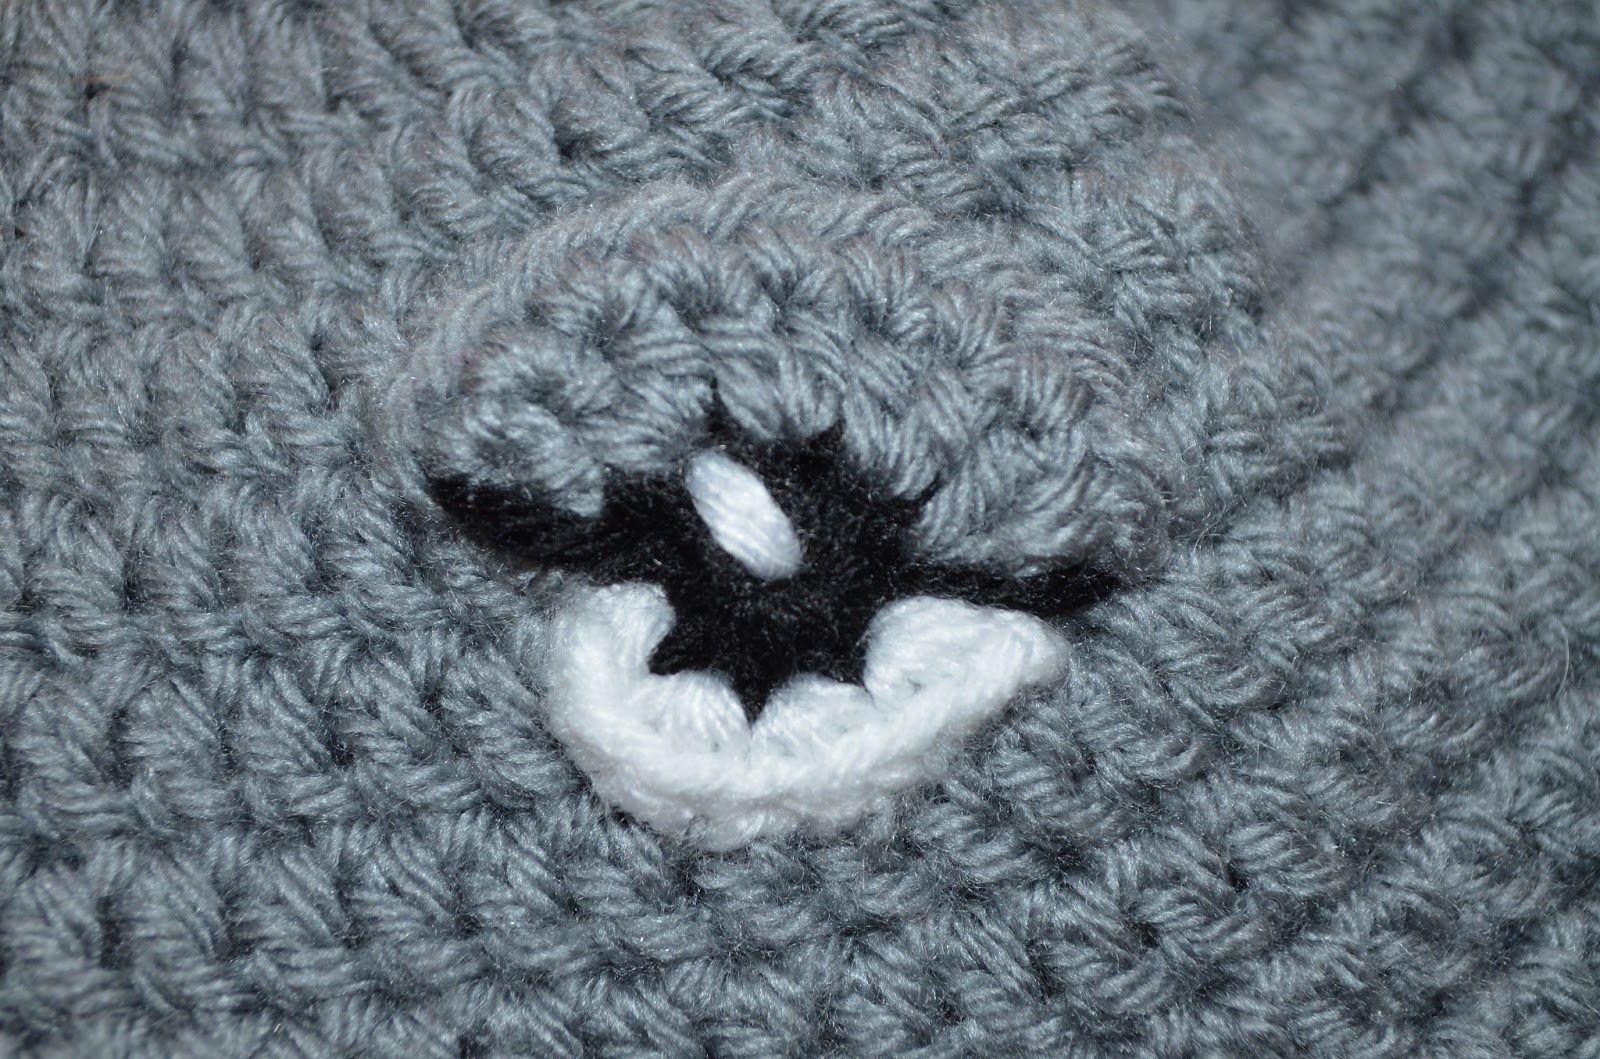
Round 1: Join with white and chain 1, in the same st make 2 SC, and then make 2 SC in the next 3 sts., tie off leaving a long string to sew the white part of the eye to the hat and make a fleck in the black part of the eye (see photo). Join on the silver grey, ch 1 and make 2 HDC in the same st then 2 HDC in the next 3 sts, ch 1 turn and make a second row of grey with 1 HDC in the top of each st, tie off leaving enough string to sew the grey half of the eye on the hat. To finish the eye with your needle and a double strand of black string make a line at the bottom of the grey to the pupil with two stitches.
Subscribe to:
Posts (Atom)