Sometimes I get an idea for something but then it takes a while to figure out shortcuts and make improvements, this one is one of those hats, I have been working on it and looking at it, and drawing different ideas for an eye that were more like a shark, so finally here it is. My grandson Liam was official hat tester, and frankly he didn't want to wear a hat for the picture since it was so nice out today, so he opted out of the photo. For this hat I used Vanna's choice yarn in the following colors:
Black
White
Silver Grey
Scarlet
I used an I/5.5mm hook
I also used a 7/8" button, but 5/8 would work too.
Starting with Silver Grey make a loop, either 4 chain loop or magic loop, then ch 2.
Round 1: make 12 DC in the loop and sl st at the top of the first DC, ch 2.
Round 2: 2 DC in each st around and sl st at the top of the first DC, ch 2 (24 DC)
Round 3: 2 DC in the first st, 1 DC in the next, repeat around and sl st at the top of the first DC, ch 2 (36 DC)
Round 4: 2 DC in the first st, 1 DC in the next two sts, repeat around and sl st at the top of the first DC, ch 2 (48 DC)
Round 5: 2 DC in the first st, 1 DC in the next 5 sts, repeat around and sl st at the top of the first DC, ch 2 (56 DC)
Rounds 6-12: 1 DC in each st around, sl st at the top of the first DC, ch 2 (56 DC)
Start on the chin strap at the end of round 12.
Chin Strap:
Row 1: 1 DC in the next 8 sts, ch 2 and turn.
Row 2: 1 DC in the next 6 sts, DCD in the last two sts. ch 2 turn.
Row 3: 1 DC in the next 7 sts. ch 2 turn.
Row 4: 1 DC in the next 5 sts. DCD in the last 2 sts., ch 2 turn.
Rows 5 & 6: 1 DC in the next 6 sts. ch 2 turn.
Row 7: sk the first st 1 DC in the next 4 sts. ch 2 turn.
Row 8: 1 DC in the next 5 sts., ch 2 turn.
Row 9: sk the first st 1 DC in the next 4 sts. ch 2 turn.
Row 10: 1 DC in the next 4 sts. ch 1 turn
Row 11: 1 SC in the 1st st. ch 2 sk the next 2 sts 1 sc in the last st. ch 1 turn.
Row 12: 1 SC in the 1st st. 2 SC in the ch 2 space, 1 SC in the last st. Tie off string and weave in the end.
For the chin strap on the other side join leaving 18 stitches across the back of the hat, and 24 across the front of the hat, repeat rows 1 through 7 and tie off and weave in the end, sew the button on between rows 5 and 6.
For gums and teeth start at the bottom of the longer chin strap and join with scarlett, SC evenly up the front side of the chin strap and then 1 SC in each st across the front of the hat and down the short side of the chin strap. For teeth again starting at the bottom of the longest chin strap count your scarlett stitches to see how many you have, (I had 22) for each tooth you need 3 stitches and you will use a few SC at the bottom to make it so your last tooth ends where the chin strap joins the front of the hat. (see photo) I had 2 SC then 6 teeth up the front side of the chin strap. A tooth is made by making a sl st in the first st, *chain 3 then make 2 DC in the same st., sk the next st and sl st in the next st, repeat from *. You should end up with 8 teeth across the front and 4 down the button side. If you need you can leave a few SC in the corners of the mouth of the shark or at the bottoms of the chin strap.
Fin, make a magic loop and ch 2.
Round 1: 6 DC in the loop and pull it tight, sl st to the top of the 1st DC ch 2.
Round 2: 2 DC in the first st, 1 DC in the next st repeat around, sl st to the top of the first DC, ch 2.
Round 3: 2 DC in the first st, 1 DC in the next st repeat around, sl st to the top of the first DC, ch 2.
Round 4: 2 DC in the first st, 1 DC in the next st, repeat around, sl st to the top of the first DC, ch 2.
Round 5: 2 DC in the first st 1 DC in the next 2 sts., repeat around, sl st to the top of the first DC, ch 2.
Round 6: 1 DC in the next 4 sts, 1 SC in the next 6 sts, 1 DC in the next 8 sts, 1 SC in the next 6 sts, 1 DC in the last 4 sts, tie off leaving enough yarn to sew fin to the top of the hat.
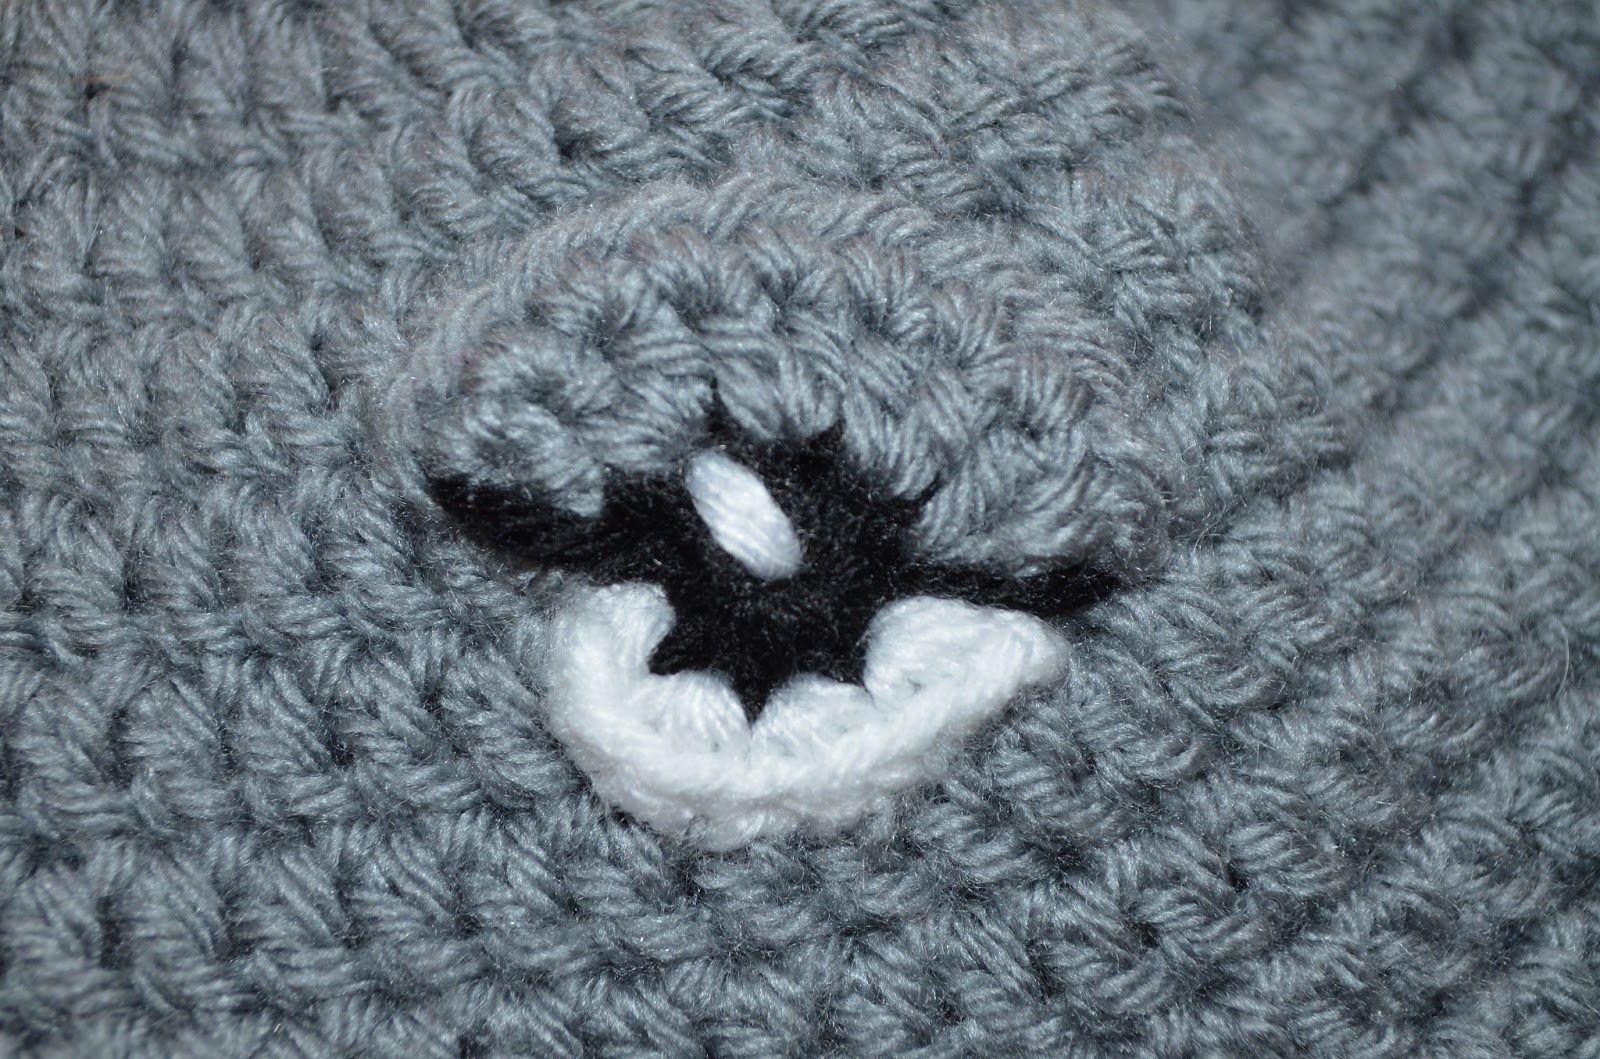
Eyes:
start with black and make a magic loop. Make 8 SC in the loop and pull it tight, sl st to the top of the first SC and tie off.
Round 1: Join with white and chain 1, in the same st make 2 SC, and then make 2 SC in the next 3 sts., tie off leaving a long string to sew the white part of the eye to the hat and make a fleck in the black part of the eye (see photo). Join on the silver grey, ch 1 and make 2 HDC in the same st then 2 HDC in the next 3 sts, ch 1 turn and make a second row of grey with 1 HDC in the top of each st, tie off leaving enough string to sew the grey half of the eye on the hat. To finish the eye with your needle and a double strand of black string make a line at the bottom of the grey to the pupil with two stitches.
.JPG)